INOCULATION OF THE PF SUBSTRATE
JARS
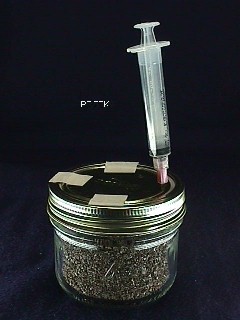 Any jar to be inoculated must be cool to the touch before
proceeding. Make sure the lid is tight. Shake the syringe
well and remove the tape from the syringe needle guard.
This shaking of the syringe is important as to redistribute
the spores in the water. Take off the tape covering the
needle holes. Remove the needle guard and insert the
needle through the lid hole. Tilt the syringe body back
towards the center of the lid with the needle tip touching
the glass. This distributes the spore water down the side
of the jar, giving a good inoculation down the side of the
substrate cake. Inoculate a few drops down each needle
hole. As the syringe plunger is pressed, observe the needle
tip against the inside of the glass. As soon as water
appears around the needle tip, release the syringe plunger
pressure. In between each hole inoculation, shake the
syringe a little to keep the spores distributed. Use 1 cc per
jar. This will allow the syringe to inoculate 10 jars. More
spore solution per jar can be used (speeds colonization),
but fewer jars can be inoculated . If the syringe needle
plugs up as it is inserted into the substrate, draw the
needle back a little and it will unplug.
Any jar to be inoculated must be cool to the touch before
proceeding. Make sure the lid is tight. Shake the syringe
well and remove the tape from the syringe needle guard.
This shaking of the syringe is important as to redistribute
the spores in the water. Take off the tape covering the
needle holes. Remove the needle guard and insert the
needle through the lid hole. Tilt the syringe body back
towards the center of the lid with the needle tip touching
the glass. This distributes the spore water down the side
of the jar, giving a good inoculation down the side of the
substrate cake. Inoculate a few drops down each needle
hole. As the syringe plunger is pressed, observe the needle
tip against the inside of the glass. As soon as water
appears around the needle tip, release the syringe plunger
pressure. In between each hole inoculation, shake the
syringe a little to keep the spores distributed. Use 1 cc per
jar. This will allow the syringe to inoculate 10 jars. More
spore solution per jar can be used (speeds colonization),
but fewer jars can be inoculated . If the syringe needle
plugs up as it is inserted into the substrate, draw the
needle back a little and it will unplug.
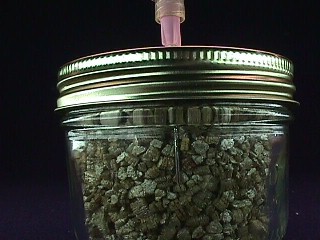 In this photo, the needle tip can be seen resting against the inside surface of the jar. Then, when the solution is injected, it will run down the side of glass, giving an even inoculation. It is also important to add, that the vermiculite in this jar photo is very course. This makes the needle more visible for the demo. This type of vermiculite is best avoided.
ALCOHOL FLAMING TECHNIQUE
If the syringe needle is touched, flame the needle to
sterilize it. An alcohol flame is a clean flame whereas a
butain cigarette lighter leaves behind an undesirable soot
residue. To produce a short burning alcohol flame, place a
tequila shotglass upside down. Using an eyedropper, put a
few drops of denatured alcohol fuel (hardware store) on
the hollow bottom of the glass and touch it with a match
or lighter. The blue flame will cleanly and safely sterilize
small stainless steel tools. Heat the needle in the flame for
a few seconds to resterilize it. There might be a few
"pops" of boiling water spurt out of the needle, but the
spores within the syringe are safe. If there is some left
over spore solution, replace the needle guard and store the
syringe for later use. Resterilize the needle immediately
before re-use. Store the syringe in a dark, cool place.
INOCULATION OF PF JARS WITHOUT
THE LIDS
This technique can also be used if canning jars are not available (1/2 pint wide mouth canning jars are perfect and should be used at all cost). If regular drinking glasses are to be used - use regular tapered sided drinking glasses (8 ounce - 250ml)
Jars can be inoculated without using a lid with holes
punched. Before trying this technique, inoculate with the
punched lid first. That will show how it works without
any problems (almost fail proof).
The only precaution to observe is to disturb the dry top
vermiculite layer as little as possible, especially when
removing the needle after the inoculation. The underlying
substrate must not be exposed to the air. Carefully move
any disturbed vermiculite back into place. If using a
drinking glass or alternate container, cover the mouth with
tin foil. Replace the tin foil cover after inoculation.
INCUBATION OF INOCULATED JARS
 After inoculation of the jars, tighten the lid bands and
retape the needle holes. Place the jars in a safe place out
of direct sunlight. Indirect light is all that is required. If
the temperature is kept around 70 degrees, germination
will begin within 3 to 5 days. Germinating spores appear
as small white fuzzy spots, quickly growing and spreading
with cottony white growth and strandy "rhizomorphs".
Any room temperature is O.K. If it gets cold indoors,
over head light shinning down on the tops of the jars is a
perfect heating technique for this culturing stage. A
clamping type light with a reflector works well for this. If
this is done, keep the temperature around 70 degrees
(don't overheat the jars - monitor the temperature with a
thermometer). A warm overall house temperature is fine.
But in the overall view, cool temperatures are never a
problem. The rule is to not overheat.
After inoculation of the jars, tighten the lid bands and
retape the needle holes. Place the jars in a safe place out
of direct sunlight. Indirect light is all that is required. If
the temperature is kept around 70 degrees, germination
will begin within 3 to 5 days. Germinating spores appear
as small white fuzzy spots, quickly growing and spreading
with cottony white growth and strandy "rhizomorphs".
Any room temperature is O.K. If it gets cold indoors,
over head light shinning down on the tops of the jars is a
perfect heating technique for this culturing stage. A
clamping type light with a reflector works well for this. If
this is done, keep the temperature around 70 degrees
(don't overheat the jars - monitor the temperature with a
thermometer). A warm overall house temperature is fine.
But in the overall view, cool temperatures are never a
problem. The rule is to not overheat.
THE CANNING JAR LID
(loose or tight)
There are two choices with the lids during incubation -
tight or loose. With a very high moisture content (good
for fruiting), a tight lid can cause water to collect in the
bottom of the jar. This is to be avoided. If it happens, the
lid should be kept on loose during incubation. Tape the canning jar lid to the band to make the lid act as a one piece lid for raising and lowering. If the
substrate is on the dry side, a tight lid will preserve the
moisture content. It is all a matter of the balance between
the water needs of the mycelium, the size of the jar, the
available air space in the jar and the type of vermiculite
used. Only by simple experimenting and comparison can
the right balance be found for a given set of conditions.
Take notes and go with what fruits the best.
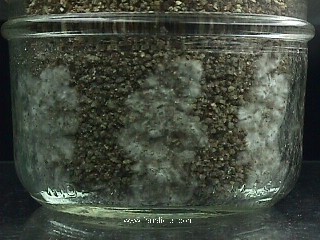
After the substrate turns white with the mycelium (2 or 3
weeks after inoculation), the jars are left to sit in indirect
light. The mycelium will continue to infiltrate the
substrate until it gets enough food to trigger the fruiting
cycle. In less than a week to a few weeks after surface
colonization of the cake, tiny white "pin" like structures
begin to appear. This is called pinning. This is the
beginning of the fruiting cycle. Soon after that, within the
week, small round fungus growths appear that soon begin
to turn yellow.
Lastly, "primordia" start to grow. These are tiny worm
like structures with tiny reddish heads. These are the first
mushrooms.
Nan's Nook
: Archives : Misc Teks :
Shroom Glossary :
Step by Step Pictorial w/pics
: Jars