| DeveloperToolbox Technical Magazine | January 2001 edition |
 |
by Dan Becker
Enhancements to the Java Sound API in Sun Java 2 version 1.3 have drastically improved the audio capability of the Java platform. Since Sun Java 1.02, users have always been able to enable some sort of sound. However, it was always through the limited sun.audio application programming interfaces: the AudioClip or the AudioDataStream. This support consisted of playing or looping a simple AU format file. Java audio improved somewhat in Sun Java 2 version 1.2 with the ability to play new file types; but, once again, users were limited in the public Application Programming Interface (API) to manipulate the sounds. The Java Media Framework (JMF) provides better programmatic control of the sound, but this framework is a Java extension and not available in every Java platform. Finally, with the Java Sound API as a standard part of Sun Java 2 version 1.3, users have both a robust feature-laden sound engine and the public programming interface to use it. Simple things such as finding the length of a sound or listening for the end of a MIDI stream now are possible. This article gives you an understanding of the Java Sound API architecture, an explanation of the key classes to this sound engine and several programming examples that explain how to put sound into your Java programs.
The Java Sound API engine (based on the Headspace Audio Engine by Beatnik Corporation) supports Apple Interchange File Format (AIFF), Audio Utility (AU), Wave (WAV), Music Interchange, Data Interchange (MIDI)(type 0 and 1) and Rich MIDI Format (RMF) file formats. It also supports any sound data source that can be expressed as a data stream of sampled data in 8- or 16-bit chunks, mono or stereo, at sample rates from 8 to 48 kHz. A new feature is the support of a-law and u-law compressed data formats. The MIDI synthesizer supports wavetable synthesis that programmers can access by loading the programmable sound bank. The software mixer of Java Sound API can mix up to 64 channels of sampled or synthesized audio.
The hardware acceleration is limited, so the Java Sound API does not take advantage of a fancy audio board. The synthesis and mixing are software based, so mixing many channels takes more CPU cycles than playing one sound at a time. (This is similar to how Sun Java 2D does great graphic manipulations, but does not take advantage of a hardware accelerated video board.) By doing the work in software, the Java language gives you cross-platform portability but at the expense of high performance and low CPU utilization.
Before delving into specific programs, lets also review the sound applications that are possible. Here is a brief list of some Java Sound API demonstrations that are publicly available.
This demo from the Sun Java 2 Software Developers Kit (SDK) creates a play list of audio files and allows you to loop or play any of the selected files from the list. The code also shows how to monitor the progress of the audio by calculating the length of the sound and creating a progress meter. Unfortunately, most of the audio-related code is embedded in the fancy Swing GUI code.
The classes for the Java2D demo are contained in the Java2Demo.jar file. To run the Java2D demo:
java -jar Java2Demo.jar |
Select the "Mix" tab and view the bottom left quadrant. You may play or loop any of the named audio objects.
This set of demos from the Java Sound API home page at gives a great overview of the types of fun audio programs that are possible with the Java Sound API:
To run the Java Sound API demo:
java -jar JavaSound.jar |
This Web site has many interesting and educational examples. These examples usually illustrate one or two basic principles at a time and are excellent learning vehicles.
After trying these examples, you can hear what the Java Sound API does. Now let's discuss how it works.
The Sun Java 2 SDK contains two excellent documents for understanding the Java Sound API architecture and API located in the guide/sound directory:
The first document states the design goals and gives an overview of the major components used to create sampled and MIDI sounds. The second document is a more in-depth discussion on how to use each of the audio classes and shows how to use classes such as the Mixer, Sequencer, and Synthesizer to connect lines and create sound.
The Java Sound API architecture is split into two worlds: sampled audio and MIDI audio. This split is evident in the packaging of the classes into javax.sound.sampled and javax.sound.midi. All public Java Sound API classes fall into or under these high-level package names. Additionally, there are many helper and implementation classes in the com.sun.media package. Other audio classes, mostly legacy and older implementations, are located in the sun.audio package.
With sampled audio, one of the most important classes is javax.sound.sampled. AudioSystem. This class can be used to acquire resources to perform audio actions; for example to get a Mixer to mix sounds, to perform audio format conversions, to get input and output lines as a source or target for audio data, or to help deal with audio files and streams. This class is similar to java.lang. Runtime or java.awt.Toolkit. It is full of useful static methods for finding information about your Java system.
The javax.sound.midi.MidiSystem class provides a similar entry point to the system MIDI resources. You can use MidiSystem static methods to get a Sequencer or Synthesizer to get information about system devices and see what types of devices and files are supported. Because of space, this article focuses on the sampled sound side of Java Sound API and specifically on the interfaces and classes to play and record sampled audio.
An overview of the class/interface hierarchy is shown in Figure 1. At the top of the hierarchy is the Line interface. This slim interface has methods for opening and closing, adding and removing listeners, and identifying itself and the controls it supports. Controls are classes that allow the Line attributes to be manipulated such as a volume, mute, pan, or reverb control.
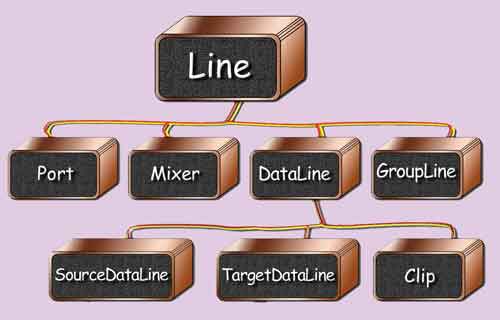
Figure 1. Overview of the class and interface hierarchy for sampled audio
Below the Line is the Port interface, which extends Line and represents concrete input and output devices for the audio system. Examples are the microphone, line in, line out, and speaker ports. A Mixer is another interface that extends Line and serves as a means of connecting one or more input Lines to one or more output Lines. A concrete Mixer object does not necessarily have to mix audio but also can act as a patch board to connect various inputs and outputs. Most Mixer methods deal with enumerating the lines and identifying lines that match particular characteristics.
The most generic item in the sample audio classes is the Line interface. A Line is a sort of digital pipeline that may be opened or closed. It is used to move sound information from one place to another. For example, a microphone is a class that implements the Line interface in recording. It connects to a Mixer, another interface that extends Line, which in turn connects to a TargetDataLine that also extends Line. The Mixer adds effects such as reverb or gain, and the TargetDataLine dumps its data to a particular audio file type. The various types of Lines are used to move data from one place (the microphone) to another (the file). The programming examples in the next section show how to do this.
The DataLine interface adds the notion of starting and stopping to a Line. A DataLine has a buffer and methods for reporting the size and position within a buffer (for example, getFramePosition,getBufferSize). The DataLine interface is implemented by the three interfaces below it: the SourceDataLine, the TargetDataLine, and the AudioClip. As shown in the following programming examples, these three interfaces are used extensively in sampled audio programming. When you request or create these DataLines, there always is some concrete class behind the interface that does the work. As a programmer, you usually manipulate the interfaces in a generic manner, but it is instructional to see which concrete class is provided.
The naming convention of the SourceData Line and TargetDataLine is slightly confusing. In the Java Sound API, you write to a Source DataLine and you read from a TargetDataLine. For example, the microphone is one type of TargetDataLine that you read from, and a speaker is one type of SourceDataLine you write to. Most users find this naming the opposite of what is expected.
The Clip interface is a type of data line whose audio information must be completely loaded before play back. In other words, the audio is contained in memory. It is opened from an AudioInputStream or a byte array of audio data and is played with the start and stop or loop methods.
An example of some general Line connections is shown in Figure 2. Some general input Ports are shown on the left. A Mixer which supports volume and reverb controls is shown in the center. Some output Line connections are shown on the right. Remember that all interfaces shown directly or indirectly extend the javax.sound.sampled.Line interface.
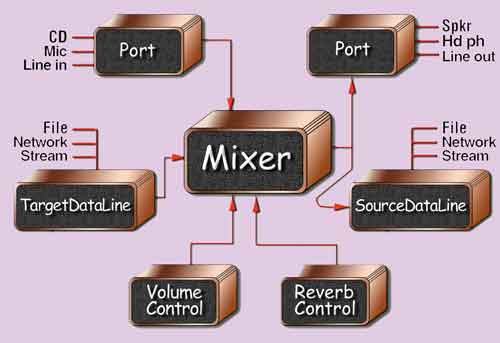
Figure 2. Example of the general lince connections
Now that you know the main classes for sampled audio programming, lets see how to actually play sounds.
Listing 1 shows an example program that plays most types of sampled audio. The complete program is contained in Play.java, but the important methods are covered in the figures below. (The complete program listings are available on the DeveloperToolbox magazine site.) First, lets look at the main method that gives an overall view of how the program works. Audio file names are provided as arguments, each is played sequentially, and the program exits. If no audio file is given, a brief help method is given. If an audio file format is not supported, an exception is thrown and the default exception handler catches the exception and reports it to the user.
/** Play audio given in file names on the command
 line. */
public static void main( String [] args ) {
 // Check for given sound file names.
 if (args.length < 1) {
  System.out.println( "AudioPlayer usage:" );
  System.out.println( "   java AudioPlayer [sound file names]" );
  System.exit( 0 );
 }

 // Play each sound given on the command line.
 for (int i = 0; i < args.length; i++ )
  playAudioFile( args[ i ] );

 // Must explicitly exit since audio creates
 // non-daemon threads.
 System.exit( 0 );
} // main
|
Listing 2 shows more detail about the playAudioFile method. The given file name String is opened as a file, and the file stream is used to open an AudioInputStream. If an IOException, an UnsupportedAudioFile Exception, or some other Exception is thrown, it is caught, reported to the user, and the method returns - simple enough.
/** Plays audio from the given file name. */
public static void playAudioFile( String fileName ) {
 File soundFile = new File( fileName );

 try {
  // Create a stream from the file.
  // Throws IOException or// UnsupportedAudioFileException
  AudioInputStream audioInputStream =
  AudioSystem.getAudioInputStream(
   soundFile );
  playAudioStream( audioInputStream );
 } catch ( Exception e ) {
  System.out.println( "Problem with file " + fileName + ":" );
  e.printStackTrace();
 }
} // playAudioFile
|
Next, lets look at the Java Sound API program in Listing 3. As a courtesy, the first thing you do is report the audio stream format to the user by printing the AudioFormat object. This shows information such as the stream sample rate, sample size in bits, number of channels, and data encoding. At this moment, the Java Sound API is not able to play compressed encodings such as a-law and u-law. It is not shown in this article, but the accompanying code in Play.java shows how to convert from one of the compressed encodings to a flat encoding such as PCM.
/** Plays audio from the given audio input stream. */
public static void playAudioStream( AudioInputStream audioInputStream ) {
 // Audio format provides information like sample
 // rate, size, channels.
 AudioFormat audioFormat =
  audioInputStream.getFormat();
 System.out.println("AudioPlayer.playAudioStream audio format: " + audioFormat );

 // Open a data line to play our type of sampled
 // audio. Use SourceDataLine for play and
 // TargetDataLine for record.
 DataLine.Info info = new DataLine.Info(
  SourceDataLine.class, audioFormat );
 if ( !AudioSystem.isLineSupported( info ) ) {
  System.out.println("AudioPlayer.playAudioStream does not " + " handle this type of audio." );
  return;
 }

 try {
  // Create a SourceDataLine for play back
  // (throws LineUnavailableException).
  SourceDataLine dataLine = (SourceDataLine)
   AudioSystem.getLine( info );

  // The line acquires system resources (throws
  // LineAvailableException).
  dataLine.open( audioFormat );

  // Allows the line to move data in and out to
  // a port.
  dataLine.start();

  // Create a buffer for moving data from the
  // audio stream to the line.
  int bufferSize =
  (int) audioFormat.getSampleRate() *
  audioFormat.getFrameSize();
  byte [] buffer = new byte[ bufferSize ];

  // Move the data until done or there is an
  // error.
  try {
   int bytesRead = 0;
   while ( bytesRead >= 0 ) {
   bytesRead = audioInputStream.read(
   buffer, 0, buffer.length );
   if ( bytesRead >= 0 )
   dataLine.write( buffer, 0, bytesRead );
   }
  } catch ( IOException e ) {
  e.printStackTrace();
 }

 // Continues data line I/O until its buffer is drained.
 dataLine.drain();

 // Closes the data line, freeing any resources such
 // as the audio device.
 dataLine.close();
 } catch ( LineUnavailableException e ) {
  e.printStackTrace();
 }
} // playAudioStream
|
The next step is to get a reference to the audio destination. Remember, a SourceData Line is used for play back, and a TargetData Line is used for recording. Create a DataLine. Info object to describe our intended destination. Do a quick check to see if the destination is supported by this system with AudioSystem. isLineSupported. If the format is supported, create a SourceDataLine for the destination using AudioSystem.getLine.
Because you are not performing any volume or reverb effects, you can skip setting the mixer and go directly to opening the output line. A mixer is created under the covers; but, in this simple program, you have no need to refer to it. Notice that the Java Sound API uses generic programming techniques that call SourceDataLine interface methods but never actually refer to a concrete object instance. If you were to print the SourceDataLine class, you might see that the concrete object is the class com.sun.media.sound.MixerSourceLine, one of the protected, under-the-covers classes mentioned earlier.
After you have found a line that supports the audio format you are seeking, open the line. This acquires the sound device and other resources needed to play the audio. Now start the line, which begins a thread that supports the reading and writing on the DataLine buffers. The next code lines open an integer buffer and move data from the AudioInputStream to the SourceDataLine using the buffer. Eventually the audio samples reach the audio device and sound is heard from the speakers. Most Java Virtual Machines (JVMs) write data to the audio device quickly enough so that the sound is smooth and continuous. However, if this write thread is paused or the written data does not keep up with the play back, you will hear gaps of silence in the sound. Once all the data is written to the DataLine, the line is drained and closed, ensuring the last few samples of audio are written and played by the audio device. The method returns and you are ready for the next sound.
The previous section showed how to play audio using the Java Sound API. Now lets look at how you record audio. The procedure is similar to play back, although you reverse the direction of the flow of the data. The complete code is located in Record.java, but the more interesting points are illustrated in the listings below.
Listing 4 shows the basic flow of the program. Like the Play.java program, you look at the audio data format and get a DataLine for the audio data. In this case you are recording, so that means you have to get and open a TargetDataLine. The method that translates the input arguments into an appropriate audio format for output is not shown. The code is straightforward and basically matches strings to the proper sample rate, sample size, data format, and channel count.
public static void main( String [] args ) {
 // ...
 try {
 // Create a TargetDataLine for record (throws   // LineUnavailableException).
 TargetDataLine dataLine = (TargetDataLine)
  AudioSystem.getLine( info );
 // Open the line. Acquire the device. (throws
 // LineUnavailableException).
 dataLine.open( targetFormat );
 // Create a thread that will read the line data into
 // a buffer
 DataReader dataReader = new DataReader(
  dataLine );

 System.out.println("Press ENTER to start the recording." );
 try { System.in.read();
 } catch ( IOException e ) { e.printStackTrace(); }
 dataReader.startRecording();
 System.out.println( "Recording..." );

 System.out.println("Press ENTER to stop the recording." );
 try { System.in.read();
 } catch ( IOException e ) { e.printStackTrace(); }
 dataReader.stopRecording();
 System.out.println( "Recording stopped." );

 // Write the audio stream to a file.
 createAudioFile( dataReader.getAudioInputStream(),
  args[ 0 ] );
 } catch ( LineUnavailableException e ) {
  e.printStackTrace();
 }

 // Must exit explicitly since audio creates
 // non-daemon threads.
 System.exit( 0 );
} // main
|
Unlike the Play.java program that was single threaded at the application level, the Record.java program is multi-threaded. This is done so that the main thread can check for a key press to end the recording session. Encapsulated by the DataReader class, the secondary thread reads and writes that data much like the playAudioStream method in the last program. As shown in Listing 4, the program opens a TargetDataLine, kicks off the Data Reader thread, checks for a key press, and writes the audio stream to a file when it is done. Along the way, the program checks for exceptions in case there is any trouble reading or writing the data.
In Listing 5, lets look at the DataReader class, whose purpose is to move audio data from the TargetDataLine to an internal byte array stream. When the DataReader is constructed, it creates an integer array that holds portions of the audio data. DataReader extends Thread, which means that its run method will execute when the Thread start method is called. In the run method, data is moved from the TargetDataLine to a stream using the integer buffer. The other methods in this class are used to start and stop the thread, and they perform the appropriate set up and clean up on the lines and streams.
/** Moves data from the given target line to the given output stream. */
class DataReader extends Thread {
 public DataReader( TargetDataLine dataLine ) {
  this.dataLine = dataLine;
  this.outputStream =
   new ByteArrayOutputStream();

  AudioFormat audioFormat =
   dataLine.getFormat();
  int bufferSize =
   (int) audioFormat.getSampleRate() *
   audioFormat.getFrameSize();
  buffer = new byte[ bufferSize ];
 }

 public void startRecording() {
  // Allow the line to start moving data.
  dataLine.start();
  super.start();
 }

 public void stopRecording() {
  // Continues data line I/O until its buffer
  // is drained.
  dataLine.drain();
  // Release any resources the line has
  // acquired.
  dataLine.close();

  running = false;
  try {
   outputStream.close();
  } catch ( IOException e ) {
   e.printStackTrace();
  }
 }

    // ...

 // Thread role
 public void run() {
  running = true;
  while ( running ) {
  // Move data from the target line (input)
  // to the buffer (output).
  int bytesRead = dataLine.read( buffer, 0, buffer.length );
  if ( bytesRead >= 0 )
   outputStream.write( buffer, 0, bytesRead );
  } // while
 } // run

 // Fields
 protected TargetDataLine dataLine;
 protected ByteArrayOutputStream outputStream;
 protected boolean running;
 protected byte [] buffer;
} // class DataReader
|
Now, lets return to the main part of the Record.java program and look at how the output audio file is created. Using the DataReader class, the program has read from the Target DataLine and amassed audio data in an internal stream. In Listing 6, the createAudioFile method takes the DataReader stream and sends it to a file name. The file format of the audio file is based on the extension of the given file name. This code has a non-object-oriented if-then-else ladder, but the AudioSystem. getAudioFileTypes method does not appear to work in Sun Java 2 version 1.3. Once the file format is determined, a new File is created using the file name and the audio format of the stream. The AudioSystem write method moves the stream to an audio file.
/** Convert a stream of captured audio data to a suitable output file. */
public static void createAudioFile( AudioInputStream audioInputStream, String fileName ) {
 java.util.StringTokenizer st = new java.util.StringTokenizer( fileName, "." );
 String baseName = st.nextToken();
 String extension = st.nextToken();

 // Determine output type. There appears to be a
 // bug with:
 // AudioFileFormat.Type [] fileTypes =
 // AudioSystem.getAudioFileTypes();
 AudioFileFormat.Type outputType = null;
 if ( extension.equalsIgnoreCase( "AU" ) )
  outputType = AudioFileFormat.Type.AU;
 else if ( extension.equalsIgnoreCase( "WAV" ) )
  outputType = AudioFileFormat.Type.WAVE;
 else if ( extension.equalsIgnoreCase( "AIFF" ) )
  outputType = AudioFileFormat.Type.AIFF;
 else if ( extension.equalsIgnoreCase( "SND" ) )
  outputType = AudioFileFormat.Type.SND;
 else {
  System.out.println( "Could not get output" + " type from extension \""
     + extension + "\"." );
  return;
 } /* endif */

 try {
  AudioSystem.write( audioInputStream,
   outputType, new File( fileName ) );
  System.out.println( "Record wrote sound " + " to file " + fileName );
 } catch ( IOException e ) {
  e.printStackTrace();
 }
} // createAudioFile
|
Lets take a moment to talk about security and what effects you may see as a result of recording. When running a Java Sound API application with no security manager, like the examples presented in this article, you can play and record sounds. If the Java Sound API application is using the default security manager, you can only play audio. When running Java Sound API applets with the normal applet security manager, you can play sounds, but you cannot record. To change these permissions, you have to add the proper permissions to the security policy file. The sampled package includes an AudioPermission class to help your programs find which operations are legal. Be aware of these security issues if your Java Sound API program throws a security exception that you did not expect.
With the explanation of a few Java Sound API concepts, this article shows how simple and straightforward Java audio programming can be. If you have written audio programs in earlier Java versions, the new public Java Sound API is much more robust and gives you greater control over the audio. Another advantage is the ability to manipulate the individual data streams as shown in the programming examples. In previous versions of the Java Sound API, you needed access to the entire sound clip before a sound could be played. Now you can buffer and read the sound using any sort of Producer/Consumer scheme, opening the way to network and streaming audio. There are many more things you can do with Java audio thanks to the new Java Sound API. Hopefully this article has whetted your appetite for more.
Complete listings of Play.java and Record.java are available from the DeveloperToolbox download catalog. After you accept the license agreement, select the custom HTML, Java, or HTML catalog to view our approximately 1000 products, tools, and information. Go to the Sample Code category and youll find this article listed under the DeveloperToolbox Technical Magazine heading.
Find the following article-related categories, products, or tools on your DeveloperToolbox CDs or online catalog:
 |
|
 |