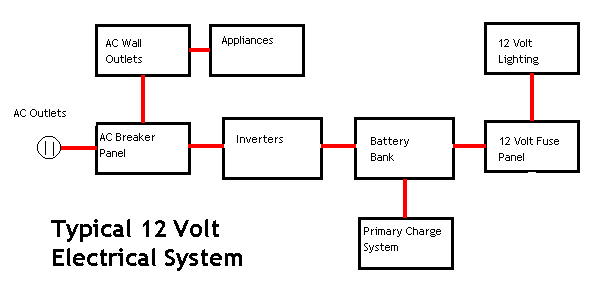

As you read through this information, we will talk about all the different
parts of this system and discuss some of the very useful additions and improvements
that you can make yourself. Also included will be some highly technical info
that you can bypass if it doesn't interest you. So, let's get started by talking
about batteries. The battery is the heart of the 12 volt system. No other single
component is as critical to the system's functioning as your battery system!
That's why a lot of time needs to be spent talking about the care and feeding
of your battery(s).
Batteries
Discovering the Battery:
Sure, we all know what a battery is.... it's that thing that goes dead when
you leave the headlights on overnight! But, in reality there's a little more
to it than that, so a review of battery basics is in order here..
A battery is an electrical storage device. Batteries do not make electricity; they store it, just as a water tank stores water for future use. As chemicals in the battery change, electrical energy is stored or released. In rechargeable batteries this process can be repeated many times. Batteries are not 100% efficient - some energy is lost as heat and chemical reactions when charging and discharging. If you use 1000 watts from a battery, it might take 1200 watts or more to fully recharge it. Slower charging and discharging rates are more efficient. Practically all batteries used in 12V applications are Lead-Acid type batteries. Even after over a century of use, they still offer the best price to power ratio.
Batteries are categorized in two ways:
by application (what they are used for)
and by construction (how they are built). The major applications are automotive, marine, and deep-cycle. Deep-cycle batteries include solar electric (PV), backup power, and RV and boat "house" batteries. The major construction types are flooded (wet), gelled, and AGM (absorbed glass mat). AGM batteries are also sometimes called "starved electrolyte", because the fiberglass mat is only 90% saturated with Sulfuric acid. Flooded may be standard, with removable caps, or the so-called "maintenance free" (without caps). All gelled are sealed and a few are "valve regulated", which means that a small valve keeps a slight positive pressure in each cell. Most AGM batteries are sealed and valve regulated. Sealed gell and AGM batteries offer the convenience of no maintenance and produce less gas, so at first glance, they may appear more attractive than standard flooded cell batteries. There is a down side here, tho.... These batteries, especially the gell cell type, require precise control of the charging process to prevent permanent damage by overcharging. They also tend to be significantly more expensive and have a somewhat shorter lifespan. It all depends on what premium you put on the maintenance free aspect of it. In my opinion, the standard flooded cell battery offers better overall performance for the price and will probably last a lot longer in most common 12V applications. The need to add water periodically is a small price to pay for the advantages you get. I strongly suggest that you avoid the "maintenance free" flooded cell batteries... they truly aren't a good design: they are simply a standard flooded cell battery with sealed cells. Each cell has a small valve to release excessive pressure. They still can be run low on electrolyte with heavy usage and fast charging, and there's no way to add water, so the batteries often die young.
It's important to understand the differences in battery types...
Starting batteries are normally used to start and run engines. Engine starters need a very large starting current for a very short time. Starting batteries have a large number of thin plates for maximum surface area. The plates are composed of a Lead "sponge", similar in appearance to a very fine foam sponge. This gives a very large surface area, but if deep cycled, this sponge will quickly be damaged and will fall to the bottom of the cells. Automotive batteries will generally fail after 30 or more deep cycles.
Deep cycle batteries are designed to be discharged down as much as 80% repeatedly, and have much thicker plates. The major difference between a true deep cycle battery and others is that the plates are solid Lead plates - not sponge. Unfortunately, it is often impossible to tell what kind of battery you are really buying in some of the discount stores or places that specialize in automotive batteries.
Many Marine batteries are actually "hybrid", and fall between the starting and deep-cycle batteries, while a few are true deep cycle. In the hybrid, the plates may be composed of Lead sponge, but it is coarser and heavier than that used in starting batteries. It is often hard to tell what you are getting in a "marine" battery, but most are a hybrid. "Hybrid" types should not be discharged more than 50%.
A battery's capacity for storing energy is rated in several different ways, depending on the battery type. Starting batteries are often rated in Cold Cranking Amps or CCA. CCA is the discharge load in amps which a battery can sustain for 30 seconds at 0 degrees F. and not fall below 1.2 volts per cell (7.2V on 12V battery). This battery rating measures a burst of energy that a car needs to start on a cold morning.
Deep cycle batteries are often rated in Amp/Hours. Amp/Hour rating of battery capacity is calculated by multiplying the current (in amperes) by time (in hours) the current is drawn. For example: A battery which can deliver 4 amperes for 20 hours before being discharged would have a 80 amp-hour battery rating (4 X 20= 80).
You may also see batteries rated with a Reserve Capacity. RC is the number of minutes a new, fully charged battery at 80 degrees F. will sustain a discharge load of 25 amps to a cut-off voltage of 1.75 volts per cell (10.5V on 12V battery). This battery rating measures more of a continuous load on the battery. For 12V use, this rating is a little less useful, as the common loads that 12V use puts on a battery are a lot less than that 25 amp load used to determine RC.
I feel that the best bet is to consider batteries by their amp/hour rating,
so that is the rating method used throughout this article.
Selecting the correct batteries is all about lifespan.... The right batteries
will last a lot longer, leaving you with more money for the finer things
in life! The lifespan of a battery will vary considerably with how it is
used, how it is maintained and charged, temperature, and other factors.
We'll talk more about maximizing the lifespan of your batteries later, but
for now, here are some typical expectations for batteries used in deep cycle
service:
Starting: 3-12
months
Marine: 1-6
years
Golf cart:
2-8 years
Deep cycle
(L-16 type etc.): 4-8 years
Your battery bank will consist of two or more batteries run in parallel. This means that, although you may have a dozen 12V batteries hooked together in your bank, you're still drawing only 12 Volts from the bank all the time.
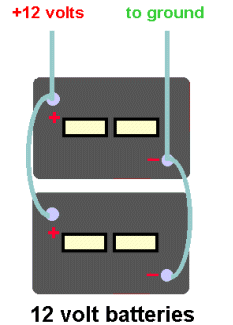
When replacing your batteries, remove the negative cable first because this will minimize the possibility of shorting the battery when you remove the other cable. Next remove the positive cable and then any hold-down bracket or clamp you may have installed. Dispose of the old battery by exchanging it when you buy your new one or by taking it to a recycling center. Please remember that batteries contain large amounts of harmful lead and acid.
After removing the old battery(s), be sure that the battery tray and cable terminals or connectors are clean. Auto parts stores sell a cheap wire brush that will allow you to clean the inside of a terminal clamps and the terminals. If the terminals, cables or hold down brackets are severely corroded, replace them. Keep track of the markings you made on the cables before replacing them!
Thinly coat the terminals and terminal clamps with a high temperature grease or petroleum jelly (like Vaseline) to prevent corrosion. Place the replacement battery(s) so that the cables will connect to the correct terminals. Be extra careful here, as reversing the polarity of the battery when connecting it may severely damage or destroy some parts of your electrical system. Replace the hold-down brackets or straps to secure the batteries in place, then reconnect the cables in reverse order, i.e., attach the positive cable first and then the negative cable last.
Before using the battery(s), check the electrolyte levels and state-of-charge. Refill or recharge as required.
A word of Caution:
If you have decided to add additional batteries to your system, be sure
to build and use a battery bank room or compartment specially designed and
vented for batteries. Never place batteries in an unvented compartment as
potentially explosive hydrogen gas will build up. Never place batteries
in any compartment where electrical sparks or other ignition sources may
exist. ( a simple 12 volt light with a switch on it is an excellent source
of ignition spark!!) Also, be sure to secure batteries with straps or brackets
to prevent them from moving about if the shelves are bumped. An unsecured
battery may tip over and spill acid, or worse, may short out against any
metal objects and cause a fire. If you are setting up a new battery bank,
don't do a half-assed job!
You must keep an eye on the electrolyte level in the batteries. Most premature failures are caused by low electrolyte levels, and there's just no excuse for it, as it's simple and cheap to keep the batteries filled to the top. Electrolyte is lost whenever the batteries are charged and also when the batteries are discharged heavily. You should check the level in each cell of your batteries regularly. I recommend at least once a month, but it may be necessary to check and top off your batteries more often, depending on usage and how you charge them. At all costs, you must keep the electrolyte level above the plates at all times. In the warmer climates and during the summer, check the electrolyte levels more frequently. To replenish the electrolyte, add distilled water as required. Never add acid-- just distilled water and do not overfill. Never use anything except distilled water! Tap water contains a lot of chemical and mineral impurities and will kill your battery before its time.
A word of Caution: Batteries contain a sulfuric acid electrolyte which is a highly corrosive liquid. Don't get any on you! In case of a spill or splash, immediately flush the affected area with lots of cold water to dilute the acid. A mixture of baking soda and water can also be used to neutralize the acid, but watch out for the foam that will be generated! Be careful and pay attention to what you are doing! Also, avoid generating sparks, smoking or open flames in the vicinity of batteries.... batteries produce flammable hydrogen gas (remember the Hindenburg?) and can explode violently if the gas is ignited. This is especially important when batteries are housed inside any sort of compartment. Again, protective clothing and safety glasses are recommended to protect you in case of accident. Please treat batteries with the respect they deserve.
Maintaining the correct electrolyte levels, tightening loose hold-down clamps and terminals, and removing corrosion is normally the only preventative maintenance required for a battery. However, you can extend your battery's life by keeping your battery charged properly and avoid deep discharges. Let me explain:
A battery "cycle" is one complete discharge and recharge cycle. It is usually considered to be discharging from 100% to some point not lower than 20%, and then charging back up to 100%. Battery life is directly related to how deep the battery is cycled each time. If a battery is discharged to only 50% each cycle, it will last about twice as long as if it is cycled to 20%. Running the battery down totally flat will have a very negative effect on the lifespan of the battery. See the table below for voltages as related to depth of discharge. This chart is designed to be used when monitoring a battery under load. This chart is a little more useful to the average 12Ver, as we are most interested in monitoring the state of charge of our battery bank while it is actually in use. See the Testing your batteries section below for information on determining open circuit state of charge using either a volt meter or a specific gravity tester.
|
|
|
|
|
|
|
|
|
|
|
|
|
|
|
|
|
|
|
|
|
|
|
|
|
|
|
|
|
|
|
|
|
|
|
|
If the battery has been charging, then it's important to let the battery set for 2 to 3 hours without a load or charger connected to stabilize before testing. Otherwise, your reading will be high, caused by a phenomenon called "surface charge" It is also necessary to invest in a good digital voltmeter.... it's the only meter that will offer the necessary accuracy to properly test your battery system. It's possible to install your own panel mount digital voltmeter... I'll tell you more about that in the section on monitoring. For now, it's important that you understand that your battery's life is adversely affected by too deep a discharge.
At this point, it's also important to note that the
battery voltage will be affected by temperature.... The chart above, and
most other ratings applied to Lead/Acid batteries assume that the battery
is at room temperature: 21 degrees C or about 70 degrees F. As the temperature
of the battery drops, so will the fully-charged voltage reading. I have
found a lot of conflicting information about this phenomenon, but it seems
to be safe to say that for each 10 degrees F drop in temp, you can expect
to see the voltage drop about a tenth of a volt. (.10 volt) That means that
a battery at 32 degrees F with a no-load voltage reading of 12.35
volts is fully charged. It's therefore a very good idea to maintain
room temperature in your battery compartment.
Battery capacity (how many amp-hours it can hold) is
reduced as temperature goes down, and increased as temperature goes up.
This is why your car battery dies on a cold winter morning, even though
it worked fine the previous afternoon. At freezing, the battery's capacity
is reduced by 20%. At approximately -22 degrees F (-27 C), battery AH capacity
drops to 50%. Capacity is increased at higher temperatures - at 122 degrees
F, battery capacity would be about 12% higher. Even though battery capacity
at high temperatures is higher, battery life is shortened. Battery
capacity is reduced by 50% at -22 degrees F - but battery LIFE increases
by about 60%. Battery life is reduced at higher temperatures - for every
15 degrees F over 77, battery life is cut in half. In reality, this is fascinating
information, but isn't really terribly important.
Most flooded batteries should be charged at no more than the "C/10" rate for any sustained period. "C/10" is the battery capacity in amp/hours divided by 10. For a 220 AH battery, this would equal 22 Amps. Charging at 15.5 volts will give you a 100% charge on Lead-Acid batteries. Note that flooded batteries MUST bubble (gas) somewhat to ensure a full charge, and to mix the electrolyte. Float voltage for Lead-Acid batteries should be about 2.15 to 2.23 volts per cell, or about 12.9-13.4 volts for a 12 volt battery. Flooded battery life can be extended if an equalizing charge is applied every 10 to 40 days. This is a charge that is about 10% higher than normal full charge voltage, and is applied for about 2 to 16 hours. This makes sure that all the cells are equally charged, and the gas bubbles mix the electrolyte. If the liquid in standard wet cells is not mixed, the electrolyte becomes "stratified". You can have very strong solution at the top, and very weak at the bottom of the cell.
First off, visually inspect for obvious problems.... for example; damaged cases, corroded terminals or cables, loose hold-down clamps or cable terminals, or low electrolyte.
If you have just recharged your battery, then a phenomenon known as "surface charge" will cause the battery voltage to be higher than normal. To insure accurate readings, you must eliminate any surface charge before testing. Use one of the following methods;
1. Allow
the battery to sit for six hours with no load or charger connected, or...
2. Apply
a 25 amp load for three minutes and wait five minutes, or...
3. With a
battery load tester, apply a 150 amp load for 10-15 seconds.
The battery under test must be disconnected from any load or charger when testing. This is referred to as "Open Circuit". Use the following table, determine the battery's state-of-charge. The best way to measure the state-of-charge is to check the specific gravity in each cell with a hydrometer. A temperature compensating hydrometer will cost approximately five dollars at an auto parts store. If the battery is sealed, then the correct procedure to test it is to measure the battery's voltage with a good quality digital DC voltmeter with an accuracy of .5% or better. Voltages are shown for both 12 volt and 6 volt batteries.
|
|
|
|
|
|
|
|
|
|
|
|
|
|
|
|
|
|
|
|
|
|
|
|
Ladies, and Gentlemen! Step right up and learn about the newest idea to come from old ideas! You’ve heard about the industrial revolution, you’ve heard about the sexual revolution, you’ve heard about the political revolution… well, welcome, one and all to the 12-Volt Revolution!
That’s right, ladies and gents, you can join the 12-volt revolution today, and get rid of those annoying electric bills forever! With the simple implementation of a few inexpensive devices, you can be providing your own electricity, at a tiny fraction of the cost you’re paying now!
Okay, enough theatrics… here’s how:
Thanks largely to America’s “melting pot” philosophy, most of us have some amount of Gypsy Blood… which is another way of saying we love to travel! However, we’ve also been spoiled by modern conveniences, which run on electricity… and in order to allow these two facts to co-exist in our space-time continuum, it was absolutely necessary that we therefore invent… the motor home!
A motor home is really nothing but an automobile with comfortable living and sleeping quarters designed into it. And since automobiles in the modern world produce their own electricity, in 12-volt DC, is it any wonder that a whole plethora of devices were then designed to use that form of power while mimicking the operation of common household appliances? Televisions, microwaves, dishwashers, washing machines, hair dryers, toasters, you name it… the list is absolutely endless! And, for those few devices that just don’t adapt easily enough… there is the inverter, which converts 12-volt DC power to 110-volt AC in a flash… so you can run those devices as well!
Now, you don’t live in a motor home, but the cost of electricity and the dependence on a centralized system are both putting you at serious risk. So, a conversion to 12-volt DC might be in order!
There are many ways to produce 12-volt DC in sufficient quantities to power a home that’s adapted to it… Photovoltaics are probably the most expensive, converting sunlight to electricity, and it’s a great system… if you can afford several thousand dollars! But I naturally assume that you can’t, so here’s my suggestions:

First, we’ll start with the small home generator. This machine can run about three hours a day on half a gallon of gasoline (or alcohol, if necessary), and will charge a bank of a dozen 12-volt batteries in that time. A dozen batteries should provide all the power you’ll need for a day, so starting this generator and letting it run for a few hours every day can take care of your electricity needs… and if you do run low on power, during and weather for instance, you can fire it up for an emergency boost, something you can’t do with a photovoltaic system!
All it is, as you can see from the photo, is an old three horsepower lawnmower that drives an automotive alternator instead of a grass-cutting blade. The alternator charges the batteries just as it would in a car, and the simple wiring diagram that makes it work is shown in the figure below. Even if you don’t have the parts, you should be able to get them and build this… or have one built… for under $100.00. The battery mounted on the generator provides a source of portable power when you need it, as well.
|
The wiring diagram to the right shows how to connect the alternator so that it charges the battery. On the back of the alternator, you’ll find three posts, and they’re marked A, G and F. Wire them as shown in the diagram. The hot wire running to the field post will provide the initial startup charge that energizes the field when the engine is running, producing electricity. |
 |
While the diagram does not show it, a simple toggle switch should be placed somewhere between the positive post of the battery, and the field post of the alternator. Turn this switch on to charge your batteries, and off when the engine is not running, to prevent any drain of your power by the alternator itself.
If you have large AC-powered devices that you absolutely cannot live without, such as washers and dryers, well pumps, or air conditioners, you can still use this method, but you’ll have to make two adaptations… first, use a larger engine, at least eight horsepower, and second, locate a five horsepower (or larger) single-phase, 220 volt AC electric motor. Run both the auto alternator and the AC motor with the engine. When you want AC power, you’ll have to start this engine, and idle it so that the motor is driven at its rated RPM. At this speed, it will produce about 90% of the electricity it would normally consume. The wires that lead from it can be fed into your breaker box… but be absolutely certain that you know what you’re doing, and that you have the main incoming power disconnected before you do it! With this system, you can run large appliances or tools… but you’ll be burning gas all the time you’re running them, so I strongly recommend looking into 12-volt or other alternatives (for instance, did you know you can still buy a gasoline powered washing machine???)
Batteries: A battery bank is the next part of your home power system. As any DC electrician will tell you, the biggest problem most 12-volters run into is excessive battery drain. Using automotive batteries is possible, and if you have a source for them at little or no cost, then by all means go for it! But what you really need is marine or golf-cart batteries, and here’s why!
Marine and cart batteries are designed to be run dead, then take a charge again! An automotive battery isn’t, and if you run it completely dead a few times, it’s gonna reach a point where it won’t come back! Deep-cycle batteries can be bought at most boat supply stores, golf pro shops, even Wal-Mart, and if you’re going to be using this for your primary power system, they’re well worth the investment.
Your battery bank should be set up in a location that can be ventilated! Many batteries give off hydrogen and sulfuric acid fumes, and this can be an explosive mixture when it meets oxygen! I’d store the battery bank in a small ventilated shed (which can be built from pallets, like our OFS in the last section), on a porch, or in a garage with a vent opening just over the racks that hold the batteries.
Wiring: Your household wiring will carry 12-volt current,
but you’ll need to change outlets and light fixtures. There are 12-volt light
bulbs that can screw directly into your normal sockets, but they are expensive,
and we’ll be going over a much cheaper alternative in a few moments. If you’re
going to a full 12-volt system, then you can adapt your existing wiring by
replacing outlets with automotive cigarette lighter plugs, which you can gather
up at a junkyard, or buy from auto supply stores or department stores. If,
on the other hand, you plan to keep grid power for backup, you may want to
run separate wiring for your DC fixtures and appliances, or you can merely
select which circuits from your breaker box will become DC-only, and wire
accordingly. WARNING: unless you really know what you’re doing, don’t
even attempt to mess with your household circuits! Call an electrician and
get it done right!
If alternating current is an absolute necessity, for instance to power a welder or other necessary device, I suggest you look into a small diesel engine. If you’re mechanically inclined, you’ll find that a 3-53 or 3-71 Detroit engine is fairly simple to repair and maintain, and being diesel, it has an advantage that few people will tell you about: it can run on just about any kind of oil! Diesel fuel, kerosene, soybean oil, used motor oil (filtered, of course), even waste cooking oil… it may take a little work to collect and filter the fuel, but it will make that old motor tick right on over!
However, there is more energy there that you can harness! Connect the cooling system to your OFS, running the water that cools the engine through coils in your hot water storage tank before it goes to a radiator for cooling, and you’ll be able to capture all that heat, too. Hook up a water pump to draw water from your well and pump it to an elevated storage tank, to bring water to your home. An air conditioning compressor can provide a boost to your home refrigeration system, or maintain a freezer for meat storage in the hottest part of the year. And don’t forget… the alternator can keep your battery bank fully charged!
OK, now that you know all about batteries and charging, let's put some of
that stored energy to use. There are a lot of things that you can do to make
your RV home more comfortable and energy efficient. There are even a few projects
illustrated to spur your creative urges.
Sizing. Let's start by determining what it is that you want to operate.
Here's a table listing some of the more common appliances and their wattage
requirements.
|
|
|
|
|
|
|
|
|
|
|
|
|
|
|
|
|
|
|
|
|
|
|
|
|
|
|
|
|
|
|
|
|
|
|
|
|
|
|
|
|
|
|
|
|
It's obvious that your microwave requires quite a lot of power. Most ovens will draw 650 - 1500 watts. Starting surges can be as high as 1750 watts. If you want to be able to use your microwave with your inverter, your inverter should be capable of producing at least 1500 watts and be rated for a 1750 watt surge. If you want to be able to use resistance heated appliances, like a toaster oven or electric coffee maker, be sure that the inverter you choose has a high enough rating. Most of these appliances will require 1200 to 1500 watts. They don't have a starting surge, like motors or microwaves, but are hungry for watts. When in doubt, consult the owners manual for the appliance or check the ratings plate for wattage requirements.
Now is a good time to discuss just what these wattage numbers really mean
in terms of 12 volt battery power, which requires some simple calculations.
What we need to do first is figure out how many DC amps the inverter will
draw when it's making that AC power for your appliances. To put it simply,
for every 100 watts of AC power that your inverter is producing, it needs
to draw about 10 amps from your 12 volt battery system. For inverters rated
at 90% efficiency, the number is closer to 9.25 amps per 100 watts, but
for ease of calculation, just figure on trading 10 amps DC for each 100
watts AC... it's easier to figure that way and errs on the side of safety.
For those of you who just MUST have the math, here it is:
Watts = Volts x Amps, so Amps = Watts / Volts. For an inverter,
operating at 90% efficiency, the conversion can be represented thus: AC
watts / 12 volts X 1.11 = DC amps
Example... television drawing 100 watts operating on an inverter will draw
about 9.25 amps from your batteries..
100 / 12 X 1.11 = 9.25
The reason that this is important is that you only have a fixed capacity
in amp/hours available from your battery bank. A pair of 6v deep cycle batteries
or a pair of group 24 RV batteries will have a capacity of about 200 amp
hours. That means that if you run that TV from the previous example for
about 20 hours, your batteries will be flat! 9.25A X 20 hours = 185 amp/hours.
Still with me? Good! Using the chart on wattage requirements and adding
our new-found knowledge of amp hours, lets take a shot at how many amp hours
of battery bank we need to supply us for a standard days use.
|
|
|
|
|
|
|
|
|
|
|
|
|
|
|
|
|
|
|
|
|
|
|
|
|
|
|
|
|
|
|
|
|
|
|
|
|
Totals >
|
|
|
||
You begin to see that putting in a larger inverter to run bigger loads will require you to have an appropriately sized battery bank and an adequate method for recharging it! You can't hook a 2000 watt inverter to a single battery and cook the Thanksgiving turkey in the microwave! You should get a feel for your intended inverter usage and take into account the size of your battery bank before selecting an inverter. For instance, I chose a 3750 watt inverter to go with my 20 battery bank. It runs all my electronics, charges power tools, runs kitchen tools, supports my microwave, computer, televison, VCR, etc. My inverter cost about $700. And that brings us to the next topic:
Hybrid Systems. Often, it is more cost effective to purchase a smaller inverter to run the small appliances that you have and use a generator to power the more watt-hungry larger appliances, like electric dryers and ranges. This will give you quiet power for most uses and minimize the wear and tear on your generator. If you can't manage a full sized battery bank and large inverter, this hybrid approach may work better for you. It does require that you start your generator when you need to run one of those appliances, though.
Inverter types There are 3 main types of inverters. Square
Wave, Modified Sine Wave and True Sine Wave. Let's look at the differences:
Square Wave inverters are the cheapest. They also are
usually the least efficient and will not run any of your electronic equipment.
The reason for this is that the AC waveform they produce is very different
from what you get at a standard wall outlet. Instead of being a sine wave
it is a square wave. These inverters are usually functional for power tools
and motors, but will not work with your TV or stereo. Definitely not recommended!
Modified Sine Wave inverters are the middle of the road.
They produce an output wave form that is close to a true sine wave and will
work adequately with most devices, including TVs and computers. You may
be able to see some slight distortion lines on the TV or hear a slight buzz
on the stereo, but for the most part, these inverters provide quite acceptable
performance. One noted exception is that most laser printers won't work
properly with a Modified Sine Wave inverter. They are also middle-of-the-road
as far as cost goes.
True Sine Wave inverters are exactly that. They produce
a practically perfect sine wave output. These units will operate even the
fussiest electronic device, but they are much more expensive than their
cousins, the Modified Sine Wave inverters. Do you need one? Probably not,
unless you simply MUST have the best, or need it for a highly sensitive
piece of equipment.
Costs. You can expect to pay about $50 to $100 for a small portable MSW unit. RV designed units start at about $300 for a 750 watt w/charger and go all the way up to units rated at more than 5000 watts and costing over a thousand dollars. Price increases with wattage ratings and capabilities. The best thing I can suggest is to do some research. Check the links listed below for inverter manufacturers and remember to size the inverter based on your real needs.
Project: Installing
an inverter. I'm going to take you through the inverter installation
that I did for my RV. Your needs and situation will be different, but this
should give you some ideas. A word of
Caution: Always follow the inverter manufacturer's
installation guidelines, paying close attention to proper wire sizing. Installing
an inverter requires understanding of safe electrical practices and electrical
safety code. If you don't have the necessary skills, get a qualified
electrician to do the wiring. Don't take chances with safety!
Mount the inverter away from your battery bank, in a
place where it will be accessible and safe from moisture and flammable items
or gases. Inverters utilize some components that can create a spark, so
never install an inverter in the same space as the batteries! Ideally,
it should be located near the main breaker panel for the house, with the
battery bank in an adjacent or nearby room or compartment.
The next step was to wire the AC side of the inverter to my electrical system.
One of the advantages of an installed inverter is the availability of AC
power at the same outlets that you were used to using when plugged into
the grid. I simply chose the wall outlet circuits that I wanted the inverter
to power and connected through the breaker panel to accommodate my choices.
I used standard 12-2 w/gnd Romex and fittings to wire up the AC side of
my inverter. This is really simpler than it sounds, so don't worry. Your
inverter installation manual will give you some basic examples of installation
wiring.
The wiring to the battery bank is done next. I installed heavy duty battery
cable to connect the inverter directly to the batteries. It's important
to use heavy enough wire here, as some larger inverters can draw several
hundred amps when under full load! My inverter required 6 ga. wire. I also
twisted the heavy wire to help eliminate any electrical interference when
operating the unit. A fuse was used to protect the system from meltdown.
I used a 100A fuse connected directly to the positive terminal of the battery.
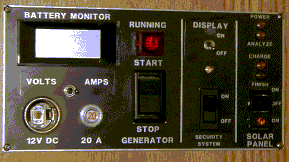
Some of the larger and more expensive inverters offer
very sophisticated control panels that will tell you battery voltage, charge/discharge
rate, amp hours used, you name it. Very handy, but somewhat expensive. A
little further on I will share some tips about constructing your own monitor
panel, like I did. In use, the inverter is almost like being back on the
grid! I can charge my laptop batteries, watch TV or a movie on the VCR,
run my kitchen appliances, and all without an actual electric bill! And
while it can be expensive to set up, you can shave a lot of costs with some
simple thought.
Sources. Here are some links to Inverter manufacturers
and retailers. In particular, RV Solar Electric's website is well worth
a look. They are a very knowledgeable company and have been doing RV systems
like these for years. Their prices are very competitive as well. I bought
my inverter there and they were very prompt and helpful... give them a look!
Trace Engineering. (360) 435-8826. http://www.traceengineering.com/
Heart Interface. (800) 446-6180. In WA (206) 872-7225. http://www.heartinterface.com/
EXELTECH. (800) 886-4683. http://www.exeltech.com/
STATPOWER. (800) 670-0707. http://www.statpower.com/
RV Solar Electric. 14415 No. 73d St., Scottsdale, AZ
85260. (800) 999-8520. http://www.rvsolarelectric.com/
West Marine. Box 50050, Watsonville, CA 95077. (800) 538-0775. http://www.westmarine.com/
Wrangler Power Products. These folks don't sell inverters, but carry
a huge selection of the wiring products you'll need to install one... 4444
S.E. 27th Ave., Portland, OR 97202. (800)962-2616. http://www.wranglernw.com/
Solar
Solar panels will provide power to charge your batteries whenever
you have sunlight. This can extend a charge period almost indefinitely and
solar is quiet and non-polluting. Even a single panel will help a lot. A
single 55 watt panel provides almost 6 amps of charge current when in direct
sunlight. That doesn't sound like much, but multiply that 6 amps by 10 hours
and you're doing some serious battery charging! Several solar panels, a
good sized battery bank and an inverter will provide you with many of the
luxuries of living on-grid, and will be silent and reliable. The only drawback
to solar is it's cost. A single 50 or 60 watt panel can cost you as much
as $400 and larger panels are really pricey... still, it's an attractive
option for those who can afford it. A solar system consists of one or more
solar panels connected through a charge controller to your 12 volt system.
Sunlight striking the panels generates power and the charge controller monitors
the battery voltage to prevent overcharging. These systems are extremely
reliable and maintenance free.
Sizing. The number and size of solar panels may be determined more by your pocket book than any other factor. For all it's advantages, solar remains very expensive. It is definitely worthwhile to have at least a single panel, at least 30 or 40 watts, just to keep your batteries in top shape. A single 50 or 60 watt panel will, in the summer, provide you with as much as 60 or 70 amp hours of charge per day. For those who want to be truly independent, a number of larger panels coupled to a larger battery bank will provide you with plenty of power, even when you have an occasional cloudy day. Cloudy days are the bane of solar charging! Even a high thin cloud layer will cut your charge current by 50% or more, and you'll only get 10-20% of rated power on an overcast day. This is when more panels will help. Most authorities agree that if you calculate your daily average energy usage and then provide enough solar capacity to exceed your daily use by 25%, you'll be all set. Let's think about that a little... If you take that daily usage table that I did for the inverter section and add the calculated additional 12 volt appliance and lighting use, we can come up with a figure to work with... see below
|
|
|
|
|
|
|
|
|
|
|
|
|
|
|
|
|
|
|
|
|
|
|
|
|
|
|
|
|
|
|
Microwave
|
1000
|
15 min.
|
250
|
25
|
|
Total >
|
|
|||
|
|
|
|
|
|
|
|
|
|
|
|
|
|
|
|
|
|
|
Total >
|
|
24
|
||
| Grand Total AH > |
|
Looks like we'll need to replace about 160 amp hours (AH) of usage every
day. If we figure that a 60-75 watt panel can produce 60 to 70 AH per day
under perfect conditions, then it's reasonable to assume that the same panel
will produce an average of about 35 AH per day, due to adverse weather conditions,
time of year and other factors. Some days are sunny, some are cloudy.....
For planning purposes, we can figure on that average output, per
panel, of about 35 AH a day. Looks like we'll need at least 5 panels
up there, and probably would be better off with 6 panels. There is always
some loss of efficiency when recharging a lead acid battery and a couple
of cloudy days will really hurt your overall charge capability! Looks like
we will either have to conserve power a bit better, or do some serious investing
in solar panels. The truth is, the above example is a bit on the energy
extravagant side, but illustrates that it's easier to use power than it
is to replace it! A small system, consisting of a single 55 watt panel,
would provide adequate power to keep me in business for a week, provided
that I am conservative and don't have cloudy weather. If it's cloudy, or
I have poor exposure to the sun, I'll have to run the generator for a couple
of hours every few days to charge the batteries.
There are a number of very good sizing guides available
on the web... RV Solar Electric has one you
should look at... click
here to check it out.
Hybrid Systems. Again, sometimes the best answer is a compromise...
a small solar system to save $$ on panels and a small generator to take
up the slack when needed can be the most cost effective way to go. The JS
Portable Power Company Homemade Generator, with a 100 Amp Alternator, will
keep those batteries fully charged with only a couple of hours of run time
a day..
Wiring. Now that your panels are mounted on your roof, it is necessary to get all those electrons from the panel to the battery. The best way is to use as heavy a gauge of wire as possible to reduce losses on the line over distance. Even though my panel maxes out at under 6 amps, I use 10 ga. wire to connect it. Bigger (within reason..) is better! Another problem is how to route the wires into the house. Drilling holes in the roof is always to be avoided when possible, so the best bet is to run it over the side and bring it in through a drilled hole under the eaves, sealing the hole around the wire with good silcone sealer (like WalMart's Shoe Goo). Once inside the house, the wire can be routed to the location of the battery bank and connected to the charge controller.
Controllers. Although it is possible to directly connect the solar panel(s) to the batteries, it is much better to use a charge controller. This device protects against overcharging of the batteries and also provides a diode to prevent reverse current flow to the panel at night. These controllers can be as fancy as your pocketbook can handle, or very simple. The simple ones will usually cost in the $50-$75 range and do the same job as the fancy ones with the meters and computer monitoring. The controller simply hooks into the charge wiring between the panel and the batteries.
Sources. Here are some links to a number of suppliers of alternative
energy systems. Browse some of these sites to get a feel for what's available,
costs and applications. Several of these sites have guides to help you design
and size your own solar electrical system.
Home Power Magazine: PO Box 520, Ashland, OR 97520. (800) 707-6585.
http://www.homepower.com/
RV Solar Electric: 14415 N. 73d St., Scottsdale, AZ 85260 (800)
999-8520. http://www.rvsolarelectric.com/
Real Goods: 555 Leslie St., Ukiah, CA 95482-5507. (800) 762-7325.
http://www.realgoods.com/
Backwoods Solar Electric Systems: 1395 Rolling Thunder Ridge, Sandpoint,
ID 83864 (208) 263-4290. http://www.backwoodssolar.com/
Alternative Energy Engineering: Box 339, Redway, CA 95560 (800) 777-6609.
http://www.alt-energy.com/
Sierra Solar Systems: 109 Argall Way, Nevada City, CA 95959 (800)
517-6527. http://www.sierrasolar.com/
Project. Build a simple DC Voltmeter for your system.
This is a simple volt meter that is easy and cheap. The meter runs off
a single 9 Volt battery and is very easy to build and install. You can connect
it to just about ant wiring in the system that carries unswitched 12 volts
and it's small enough to fit just about anywhere. The parts as listed are
available from All Electronics Corp. They have a website at http://www.allelectronics.com/
and you can download their catalog in PDF format and view it.
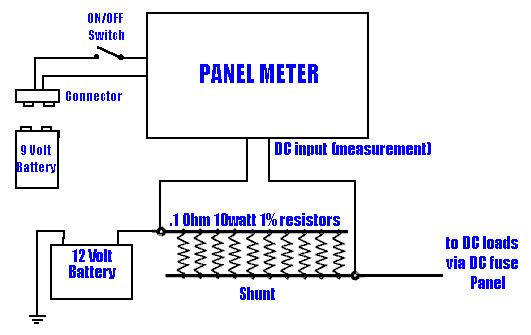
Follow the directions included with the panel meter. The resistor values
listed above are the correct ones for the meter available from All Electronics
Corp., but your meter may specify different values to use. The resistors
are installed in holes provided on the meter circuit board to form a voltage
divider to set the range of the meter to 0-20 Volts. The meter instructions
will explain how to do this. Attach the battery connector as specified in
the meter instructions. Install the small toggle switch on the battery connector
+ lead... this is used to turn the meter on and off. You can omit this switch
and have the meter on all the time, but it will run down the 9 Volt battery
in about 6 months. I chose to use the on/off switch on mine. Mount the meter
in your rig in a convenient location, preferably near a 12 volt source.
Closer to the battery is better, but not super critical. Connect the meter
input leads to the 12 volt source. A fuse would be a good idea if the circuit
that you connect the meter to isn't already fused. A 1 amp fuse will be
way more than enough, as the meter draws practically no current. See below
for a diagram.

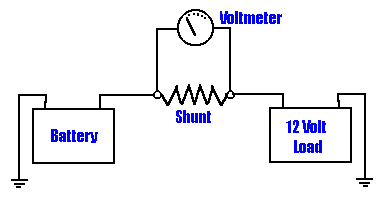
This is a little more difficult, but worth the effort. The same meter as was used above can also be used to measure DC current if a device called a Shunt is used. Put simply, a shunt is a very accurate, very low Ohm resistor that is placed in the DC positive line directly off the battery. By measuring the voltage drop across the shunt, we can determine the amperage flowing thru it.
 . .
. .
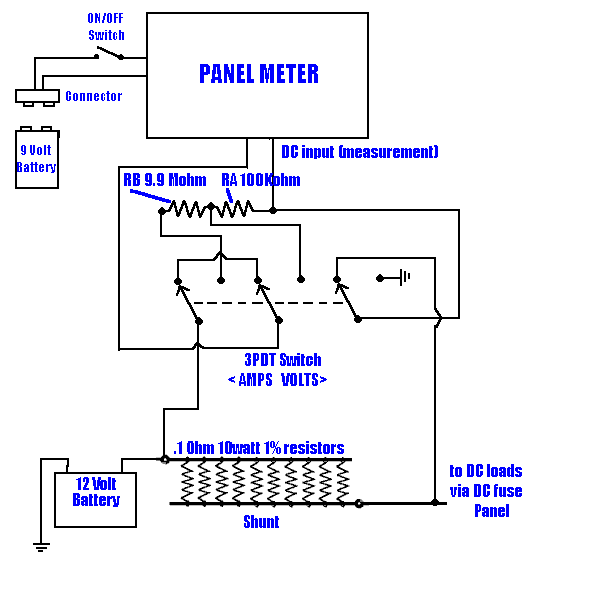
When I designed my monitor panel, I wanted to have everything in one location.
The panel has controls for the generator, the volt/amp meter, controls and
indicators for the solar panel and a handy 20A cigarette lighter socket
with a circuit breaker for heavy duty 12 volt loads. Whether you buy one
or build one, it's really worth your while to have at least an accurate
voltmeter in your rig to allow you to keep tabs on your battery condition
while dry camping. It will extend the life of your batteries by preventing
too deep a discharge and will give you the ability to see just how much
power you are using and putting back in. Prevent those "bounced" energy
checks!! ;-)
|
Draw |
|
|
|
|
|
|
|
|
|
|
|
|
|
|
|
|
|
|
|
|
|
|
|
|
|
|
|
|
|
|
|
|
|
|
|
|
|
|
|
|
|
|
|
|
|
|
|
|
|
|
|
|
|
|
|
|
|
|
|
|
|
|
|
|
|
|
|
|
|
|
|
|
|
|
|
|
|
|
|
|
|
|
|
|
|
|
|
|
|
|
|
|
|
|
|
|
|
|
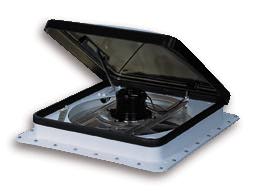 |
Definitely a great addition ... a "Fantastic Fan". This is a high
volume 12 Volt fan that you install as a roof vent. It draws very
little current and can really help keep your home cool without using
A/C. On low, it only draws a couple of amps and on high, it will exchange
the air in a room for cooler outside air in a minute or two. Find
them at any camping retailer... Try: http://www.camperschoice.com/ http://www.campingworld.com/ Adohen Supply Co. |
|
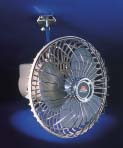
These are great little fans as well... they run on 12 volts and move a lot of air for only about a 1.5 amp current draw. A few of these, strategically placed around your home will keep you a lot cooler! Find them at camping stores or lots of automotive parts stores. |
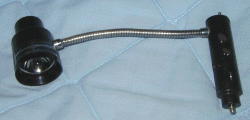 |
If you build in some 12 Volt Cigarette lighter outlets around your house, these small automotive map lights are handy additions! I use one to light my computer desk and it's great for providing light to type by without a big battery drain. They are also handy to use as night lights and can be removed and stowed when not needed. |